Ever since I proposed to my wife, I’ve dreamed of going to China. I’d wanted to visit there so badly that I even – get this – floated the idea of having our honeymoon there.
So when the NEA Foundation awarded me with the Teacher of Excellence and Global Fellowship Awards and invited 49 other teachers and me to visit the Middle Kingdom, I couldn’t pass up this opportunity… even though my wife and I bought a new house, needed to find a renter, and moved while I was there. But I lived to tell the tale:
Day 0-1: The Flight
I drove down to meet the Maryland Teacher of Excellence, stay at her home, and depart at the crack of dawn on June 21st. From here, we flew to Chicago and then met up with the teachers from Kentucky, Illinois, and the Dakotas before taking the 14-hour flight to Beijing, crossing the International Date Line and losing a day. Many thoughts swarmed my head and, thankfully, I had plenty to keep me busy: conversing with my new friends, downloaded Netflix (thanks for that innovation, tech team), and, of course, sleep.
Day 2: Beijing School, Market, Yonghe Lama Temple
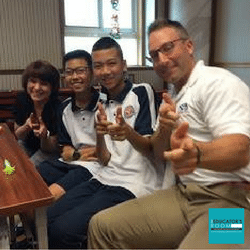 Wenhui Middle School
As all the other teachers from the various states twisted themselves through sleeping in their new time zone, we woke bright and early — to go to school, of course. We traveled, as a group, to Wenhui Middle School in the heart of Beijing. The students greeted us by singing a few American classic rock songs, and we all had our feet and fists clapping for Queen’s “We Will Rock You.” Afterward, the students came and greeted us, and each of the teachers was able to have a great 15-minute conversation with one of them. My representative was Zhang Xin Nuo, a 7th grade student. His English was quite good, but he wasn’t confident about it. We shared some questions and stories, and I learned that his parents are in the PLA (army) and that he’s a history buff, earning the school’s role as “history president” or top performer. He loves basketball and American cinema, as he aspires to be an actor. Nuo (his “first” name) doesn’t get much time for that though, because he’s expected to study for 2-3 hours each evening after a 9-hour school day.
After our conversation, the Vice Principal returned the students to class and fielded some of our questions about their school system, of which they were quite proud. I asked what they think they do better and what American education does better. She thinks China values educators more, and that promotes good will in and outside the classroom. She also wishes students in China were as open-minded and creative as American students. I found both those answers to be intriguing.
 Market
When we shared good byes with the VP and the kids, we traveled to a market to haggle. For many of the teachers (and, I’m sure, many Americans who visit), the engagement and forthrightness of the shopkeepers makes many uncomfortable. We Americans like a relatively set price for our small purchases, but much of the world makes everything negotiable, and this market was no exception. I enjoyed it, and purchased a table runner, silk scarf, and Lego characters for about 385 yuan ($55). For many of the other shopkeeps, I practiced saying boo hao (no good) pretty repetitively.
Yonghe Lama Temple
We moved next to the Yonghe Lama Temple. Built in 1694, this majestic Buddhist enclave is home to 4 separate temple chambers, the final of which includes the largest (50 foot tall) sandalwood carving in the world. Donated to be the residence of the Dali Lama, the current occupier of that role has never set foot in the building since Tibet’s invasion, which, as you can imagine, is a very divisive topic to both the Chinese and other followers of Buddhism.
Rickshaw Ride & Hutong Dinner
Our final stop took us to a rickshaw ride through the ancient back alleys of the old city to a family dinner in the Hutong District. This age-old area was set-up by the conquering Mongolians to provide homes for the bureaucrats running the country, and the homes, despite their rudimentary and small stature, are worth about $40,000 per square foot, or $4 million a piece, despite having 2 simple floors and many without bathrooms or showers. Our hosts assembled a great, home cooked meal of a variety of foods. It is here where I credit the genesis of my dumpling obsession. In true Chinese fashion, we shared them and a dozen or more other foods on a Lazy Susan before discussing food, the area, and Kung Fu with the hosts and departing for home.
Day 3: Tienanmen Square, Forbidden City, Pearl Factory, Summer Palace
Tienanmen Square
I wanted to recommend something to any visitors of China. If you try to visit the country without a guide, you’re going to struggle. The characters don’t lend to western literacy, and the language is difficult to try and pick up before your visit. Thankfully the NEA Foundation hired the Education First tour group, and our guide was Li Jun, who played the role almost to perfection. Today was our first big adventure of Chinese lore, and we started by visited the Tienanmen Square. It was here where Mao instituted the new communist government in 1949 and where that same government was met by the famous open protests some 40 years later.
The square itself is a pretty simple, open concrete field. On the square visitors are greeted by the beautiful, eastern clay terraces, and collect themselves on something called “The Dragon Line.” From this geometric shape, one can follow the major sites of the area as they could the National Lawn in D.C. This includes the Mao Mausoleum (which, because it was closed, made for not as crowded an experience), the Monument to the People’s Hero (paying homage to the military), and, of course, the Forbidden City.
Forbidden City
This area, named for how inaccessible it was to common Chinese, housed the emperor’s palace, his servants, concubines, and empress. It really gave me a sense of stature in Chinese history, as we struggle to teach 241 years of history, they have nearly 50 times the amount of years and events. This structure, for as mammoth as it is, is late to their history. Constructed in the 1600s and decorated with beautiful yellow lattice, golden floors, and sandalwood carvings, while attempting to see as many of the 9,999 rooms as possible, your senses (especially your eyes) are on overload.
Pearl Factory
The freshwater pearl factory that we visited was a great educational experience. While we were certainly there to buy things from the government-run company, we received a great tutorial. I picked up a necklace and earrings for my wife, mom, and mother-in-law.
 Summer Palace
Sometimes I simply become even more exhausted than the rest of the group, and today was no exception. While many of my colleagues enjoyed the Summer Palace, a beautiful getaway at the outskirts of Beijing, I was drained. Eight miles I guess will do that. I actually enjoyed my conversation with the Missouri and Tennessee teachers of the year more than anything, but the beautiful lake and almost unprecedented landscaping at the emperor’s old getaway were idyllic, to say the least.
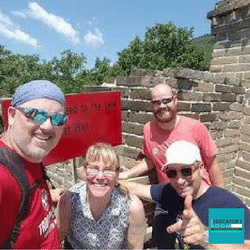
Day 4: The Great Wall
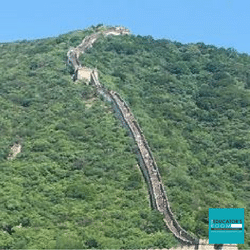 In my notes, I wrote that “if yesterday was something special, today was once-in-a-lifetime noteworthy.” A good 75 minute ride outside the city to The Great Wall is more than worth it and, though I had high expectations, everything about it here exceeded them. While I know that much of the nearly-4,000 mile Wall is in ruins or disrepair, this portion is jaw-dropping. I experienced so many feelings here. I was both equally fascinated by the natural view and the amazing, man-made architecture, which includes nearly vertical “stairs.” I was fascinated by the ancient history of this all and thought about the implications of walls in the modern era, whether built in Berlin, Germany or prospectively to be built between the U.S.-Mexican border. And I thought about China’s influence on one of my favorite shows, Game of Thrones, as essentially the Chinese were attempting to keep out the Mongolians, their White Walkers.
But most of all, I was bowled over by the fitness and energy one needs to tackle the wall. Thankfully (and surprisingly) I had more than enough in the tank to tackle 7 miles of hiking to as far as I could go in the time allotted. I was joined by the teachers from New Jersey, Oklahoma, Arkansas, Massachusetts, and Virginia. Best of all is after the heightened hike, you get to ride a toboggan down to the bottom!
I’ve been to a few historic places in my life that have just overpowered me, and that caused me to bury a little sliver of my heart there.
One of those places is Independence Hall in Philadelphia. Another is in the dome of the Hagia Sofia in Istanbul, Turkey. Still, more can be found buried in the sand on the beaches of Omaha Beach in Normandy, France, while another is wedged in the tile of the Sagrada Familia in Barcelona, Spain.
Add the Great Wall in Beijing to that list.
As you await the 2nd part of this voyage focusing on the cities of Xi’an and Shanghai, I share these links of interest for our readers:
- Apply to become or recommend an NEA Foundation Teacher of Excellence and Global Fellow
- Education First Tour Group
Other pertinent posts as The Traveling Teacher:
- My blog posts from China @ Genuine Thoughts
- African-American History Museum, February 2017
- Normandy, France, July 2016
- Rochester, N.Y., July 2014
- Denver, Colo., July 2014
- Missoula, Mont., July 2014
- Turkey, July 2011


Having just returned from three weeks in China on a heritage tour with our 18 year old daughter your brought it all back to life. I think the two greatest moments for me were when I realized I was standing on THE GREAT WALL of CHINA and seeing the Terra Cotta Warriors. As a history teacher it was unimaginable. But I agree with you China is impossible without a tour guide. We had several days on our own and language is such a barrier. With the internet not being reliable in many hotels Google Translate can only go so far. Thanks for sharing your story.